Generate Test Sales Orders Headers and Details
Generate Test Sales Orders Headers and Details
You will define and run a Test Orders Generator extractor definition in this tutorial.
- Make sure you are at the pfDataExtractor Main Form (Overview),
- Click File/New menu item to make sure the form fields are blanked out.
- If you had a previous extractor definition open on the form, you may be prompted to save the definition.
- Set Extractor Name = TestOrdersTutorial.
- Leave From tab blank.
- You will not be using it for the generation of test orders.
- Click on the To tab to make that the current tab.
- Set Database Type = SQLServerCE35.
- Set Connection String for Database =
data source='C:\Users\YourUsername\Documents\pfApps\pfDataExtractor\Destinations\SQLCE\ExtractDataCE35.sdf'; - NOTE: Copy and Paste the above connection string from here to your form.
- Set Output Table Name = Blank.
- Click Test Data/Generate Test Order Transactions menu item.
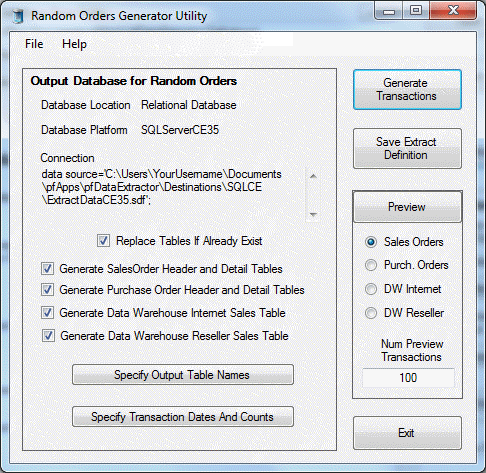
- You will see the Random Orders Generator Utility form.
- Set Replace Tables if Already Exist = True (Checked).
- Random Orders Generator Utility form should now look like the following:
- Click Specify Output Table Names Button.
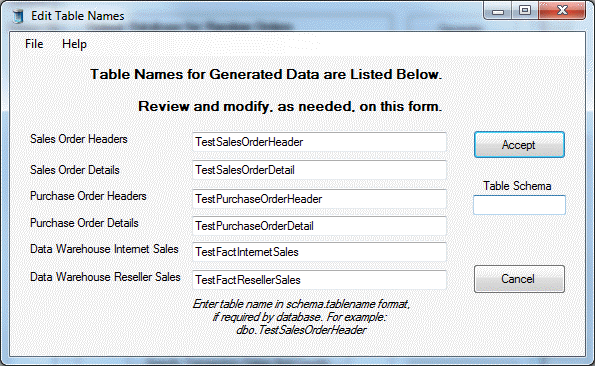
- Do not change any of the values on the Edit Table Names form that is now showing.
- Edit Table Names form should look this:
- Click the Accept Button to return to the Random Orders Generator Utility form.
- Click OK on popup message that says EditTableNamesForm Accepted.
- Click Specify Transaction Dates And Counts Button.
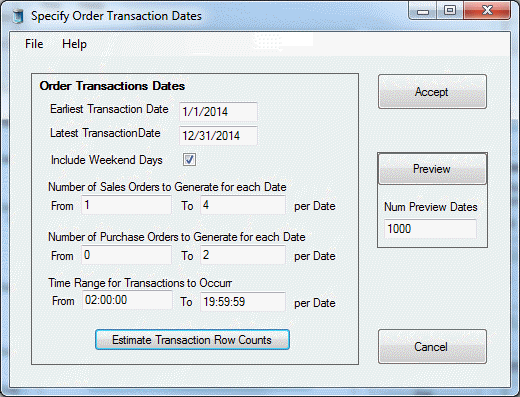
- You will now see the Specify Order Transaction Dates form.
- Modify the values on the Specify Order Transaction Dates form so that it looks like the following:
- Click Estimate Transaction Row Counts Button.
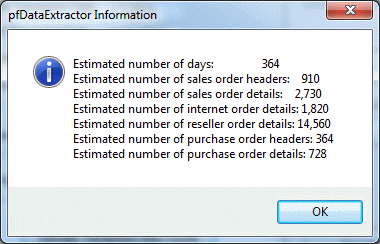
- You will see a popup message that looks something like this:
- Click OK to close the popup message.
- Click the Preview Button.
- You will see a Data Output Grid containing estimates of how many sales orders and purchase orders will be generated on a given day.
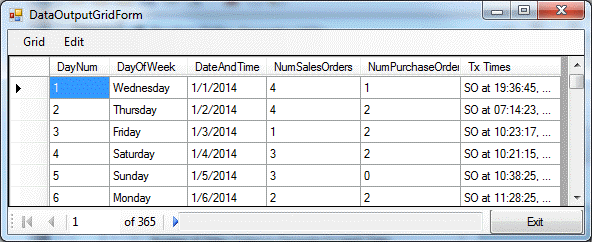
- Click Exit to return to the Specify Order Transaction Dates form.
- Click the Accept Button to return to the Random Orders Generator Utility form.
- Click OK on the popup message that SpecifyTransactionDatesAndCounts accepted.
- Click Save Extract Definition Button.
- Save folder = C:\Users\YourUsername\Documents\PFApps\pfDataExtractor\Definitions
- Save File = TestOrdersTutorial.exdef
- Click Generate Transactions Button.
- You will see a popup message like the following:
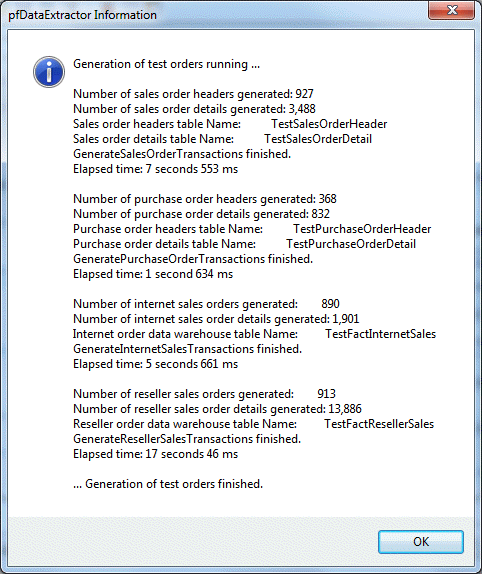
- Click OK to close the popup message.
- Click Exit to return to the Main Form.
- Notice the Message Log Window. It should look something like the following:
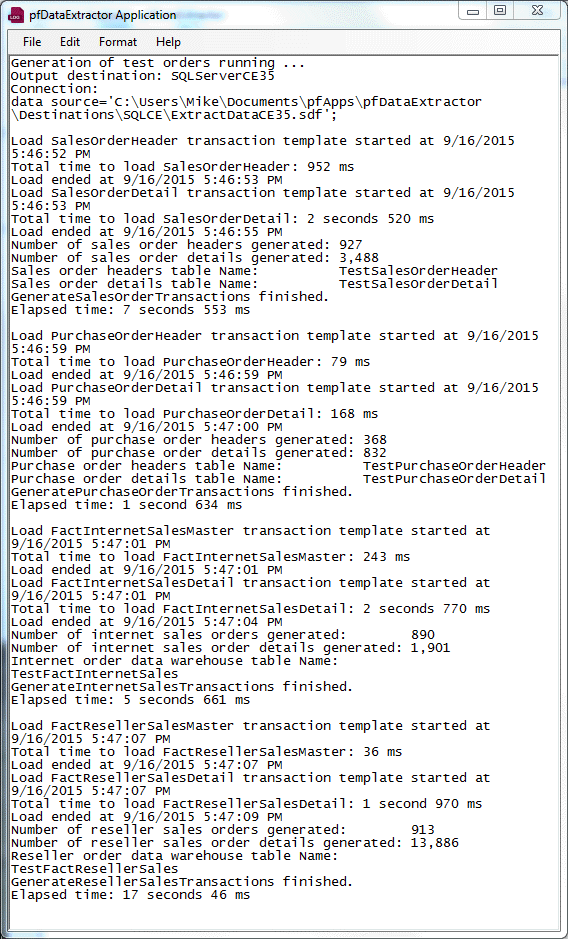
- To view the data that has been generated, do the following:
- Click the From tab to make the sources tab current.
- Set Database Type = SQLServerCE35.
- Set Connection String for Database =
data source='C:\Users\YourUsername\Documents\pfApps\pfDataExtractor\Destinations\SQLCE\ExtractDataCE35.sdf'; - NOTE: Copy and Paste the above connection string from here to your form.
- Click the Show Query Builder button on the Relational Database Source form.
- You will now see the Query Builder Form.
- Drag TestSalesOrderHeader table name from the list on the right of the form to the center area.
- Select the following columns in the table column list:
- SalesOrderId
- RevisionNumber
- OrderDate
- DueDate, ShipDate
- Status
- TotalDue
- Click the Accept Button.
- SQL Query should now equal:
Select TestSalesOrderHeader.SalesOrderID, TestSalesOrderHeader.RevisionNumber, TestSalesOrderHeader.OrderDate, TestSalesOrderHeader.DueDate, TestSalesOrderHeader.ShipDate, TestSalesOrderHeader.Status, TestSalesOrderHeader.TotalDue From TestSalesOrderHeader
- Click Preview Source Button for a Data Output Grid containing the data that was generated for TestSalesOrderHeader table.
- Click Exit to close the Data Output Grid.
- You can repeat the above steps that start with Click the Show Query Builder button to view the data for each of the test orders tables that were generated.
- Click Save Button to save the changes to the TestOrdersTutorial extractor definition.
- Click OK to close the popup message listing where the definition file is stored.
- Click Exit to close the application.