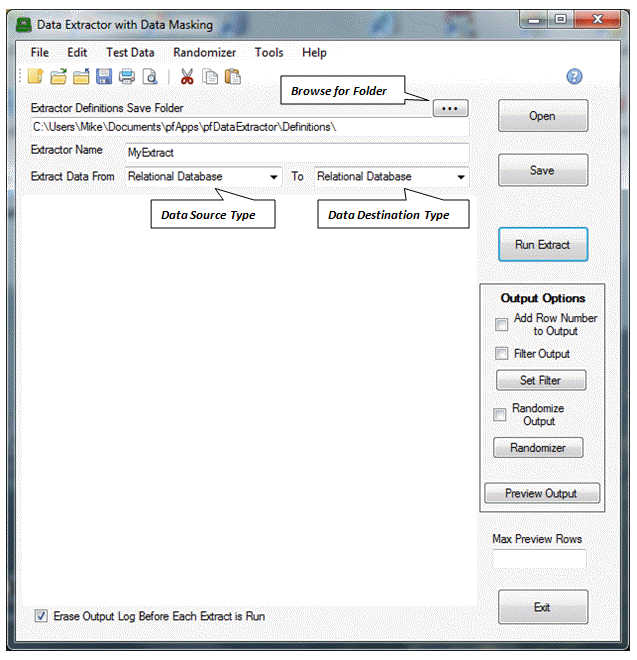
Common Form Elements for Main Form
Common Form Elements for Main Form
The main form contains several buttons and main items that are common to all the sources and destinations tabs that can be shown on this form.

Extractor Definitions Save Folder
Folder into which extractor definition files will be saved.
Browse for Folder Button
You can use the Browse For Folder button to lookup folder names.
Extractor Name
Unique name that identifies the extraction definition contained on these forms.
Name will be used as the file name for the definition when it is saved to external storage.
Extract Data
From
Select data source type from drop-down list box.

The From tab on the form will change to reflect the data source you select.
To
Select data destination type from drop-down list box.

The To tab on the form will change to reflect the data destination you select.
Open Button
Click this button to show the Windows Open Dialog.
You can select a previously saved extractor definition from the file list displayed by this dialog.
Save Button
Click this button to show the Windows Save Dialog.
You can use this dialog to save the contents of the extractor forms into an external extractor definition file.
Run Extract Button
Click this button to produce output that conforms to the current extract definition.
When extract process is finished, you will see a popup message saying the extract was successful. The message will also display the amount of time the extract took to complete.
You can also look at the Message Log Window for more detailed messages from the extract.
See Messages Overview for more information on the Message Log Window.
See How To Hide or View Messages Window for information on how to show or hide the Message Log Window.
Output Options
Add Row Number to Output
Set this option to true (checked) to include an extra column with the data table row number in the output.
Row Number will be displayed as the first column in the output.
Filter Output
Set this option to true (checked) if you want to filter the data table resulting from the data source query.
Filter is applied directly to the in memory DataView of the DataTable after the data has been loaded from the data source. (RowFilter property of the DataView object is used to determine which rows will be extracted.)
Filter is separate from any conditions you may have place in a Data Source query. Filter is applied after the query is run and the data returned to the client.
Set Filter Button
Click this button to show the Filter Definition Form. From the Filter Definition Form you will be able to bring up the Filter Builder Form.
Randomize Output
Set this option to true (checked) if you want to use data masks to hide selected data columns in the extract output.
Randomizer Button
Click this button to define how you want to mask the output data.
You will be shown the Randomizer Column Mapper Form.
See Randomizer Sources Manager Form for more information on how to define data masks.
Preview Output Button
Click this button to see a preview of the extract output in a Data Output Grid.
Max Preview Rows
Specifies the maximum number of rows to display in the Data Output Grid .
If not value is supplied for Max Preview Rows, then all rows resulting from the extract process will be displayed.
Exit Button
Click this button to close the application.
You will be prompted to save the extract definition to an external file if there are any unsaved definition changes.
Erase Output Log Before Each Extract is Run
Set this option to true (checked) to regenerate the Message Log each time an extract is run.