Creating Extract with Data Masking
Creating Extract with Data Masking
You will use the data extract definition you created in Getting Started with Data Extractor and Creating Extract with Data Filtering to step through the process for building data masks for the output data.
For more detailed information on Data Masking, see Randomizer Sources Manager Form and Randomizer Column Mapper Form
- Make sure the following extract definition has been created by the Getting Started with Data Extractor and Creating Extract with Data Filtering tutorials.
C:\Users\YourUsername\Documents\PFApps\pfDataExtractor\Definitions \FirstExtractorDefinition.exdef
- Main sure you are at the Main Form for Data Extractor with Data Masking application.
- Click File/Open menu item to bring up the Windows File Open Dialog.
- Select FirstExtractorDefinition.exdef.
- Click Open button.
- You should now be on the main form for Data Extractor with Data Masking application.
- Click the Randomizer Button.
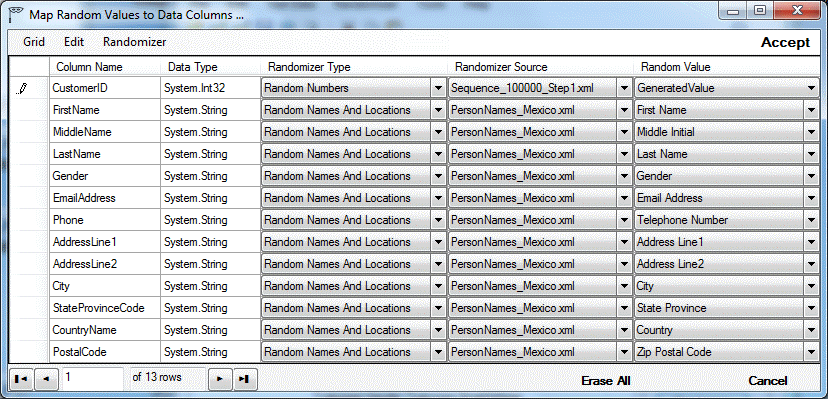
- Set the values on the Map Random Values to Data Columns form to the following:

- Click the Accept Button.
- You will be returned to the Main Form.
- Set Randomize Output = True (Checked)
- Set Max Preview Rows = 1000
- Click Preview Output Button.
- Notice the names and locations information on the Data Output Grid relates to Mexico.
- Also notice that all random names start with S or M.
- This is because Filter Output is set to True (Checked) and the filter defined in Creating Extract with Data Filtering tutorials specified that output LastName values must start with S or M.
- Click Exit on the Data Output Grid to return to the Main Form.
- Set Filter Output = False (Unchecked)
- Click Preview Output Button.
- Notice the names and locations information on the Data Output Grid relates to Mexico.
- Notice that the output LastName values are not limited to those that start with S or M.
- Click Exit on the Data Output Grid to return to the Main Form.
- Set Randomize Output = False (Unchecked)
- Click Preview Output Button.
- Notice the names and locations information on the Data Output Grid are now spread among U.S., Canada and Mexico names..
- Notice that the output LastName values are not limited to those that start with S or M.
- Click Exit on the Data Output Grid to return to the Main Form.
- Set Randomize Output = True (Checked)
- Set Filter Output = True (Checked)
- Click Preview Output Button.
- Notice the names and locations information on the Data Output Grid relates to Mexico.
- Also notice that all random names start with S or M.
- Click Exit on the Data Output Grid to return to the Main Form.
- Click the Save Button.
- You will see a prompt listing where the definition file was saved to.
- Set Add Row Number to Output to True (Checked)
- Click Preview Output Button.
- Notice the names and locations information on Data Output Grid relates to Mexico.
- Also notice that all random names start with S or M.
- The first column in the output grid is now called dgvRowNumber and shows the ordinal position of the row in the result set.
- Click the LastName column in the Data Output Grid to sort the names in ascending order.
- Click the LastName column again and the names will be sorted in descending order.
- Click the dgvRowNumber column and the data is again sorted in its original order.
- Click Exit on the Data Output Grid to return to the Main Form.
- Click File/Close menu item.
- You will be shown a prompt asking if you want to save unsaved changes to the definition.
- Click No.
- All form fields will be erased and you can either start a new extract definition or exit from the application by clicking File/Exit menu item.